

Map custom attributes in Microsoft Entra ID
Map extra user attributes from Microsoft Entra ID to Perk over SCIM, with the full target-attribute directory and steps to add and customize mappings.
Use this guide to map extra user attributes from Microsoft Entra ID (previously named Azure Active Directory or Azure AD) to Perk. For the full attribute schema, see the SCIM user model reference.
Prerequisites
Before you start, make sure you have:
- A completed Microsoft Entra ID SCIM provisioning setup. For more information, see Get started with Microsoft Entra ID SCIM provisioning.
- Microsoft Entra ID administrator access.
Attribute mapping directory
The table below lists the Perk target attributes you can map from Microsoft Entra ID. Required attributes are marked.
| Perk target attribute | Notes | Type |
|---|---|---|
userName (required) | User name. | String |
externalId | External ID. | String |
active (required) | Active status. | Boolean |
name.honorificPrefix | Prefix. | String |
name.familyName (required) | Family name. | String |
name.givenName (required) | Given name. | String |
name.middleName | Middle name. | String |
preferredLanguage | Preferred language. | String |
locale | A valid language tag as defined in RFC 5646. Perk uses it to deduce the currency, date and time format, and language when it creates the user, if those values aren't otherwise set. | String |
phoneNumbers[type eq "work"].value | Phone number. Use the format + {country_code} {phone_number}. | String |
title | Title. | String |
urn:ietf:params:scim:schemas:extension:enterprise:2.0:User:costCenter | Cost object. If a cost object with the given name isn't found, Perk creates it. | String |
urn:ietf:params:scim:schemas:extension:enterprise:2.0:User:employeeNumber | Employee number. | String |
urn:ietf:params:scim:schemas:extension:enterprise:2.0:User:manager | Line manager. | Reference |
urn:ietf:params:scim:schemas:extension:travelperk:2.0:User:gender | Gender. | String |
urn:ietf:params:scim:schemas:extension:travelperk:2.0:User:dateOfBirth | Date of birth. | String |
urn:ietf:params:scim:schemas:extension:travelperk:2.0:User:invoiceProfiles | Payment profiles. | Array |
urn:ietf:params:scim:schemas:extension:travelperk:2.0:User:emergencyContact.name | Emergency contact name. | String |
urn:ietf:params:scim:schemas:extension:travelperk:2.0:User:emergencyContact.phone | Emergency contact phone number. | String |
urn:ietf:params:scim:schemas:extension:travelperk:2.0:User:travelPolicy | Travel policy. | String |
urn:ietf:params:scim:schemas:extension:travelperk:2.0:User:uniqueId | Unique ID. | String |
urn:ietf:params:scim:schemas:extension:expense:2.0:User:policyId | Expense policy ID. | String |
urn:ietf:params:scim:schemas:extension:expense:2.0:User:creditor | Creditor. | String |
urn:ietf:params:scim:schemas:extension:expense:2.0:User:legalEntityId | Legal entity ID. | String |
urn:ietf:params:scim:schemas:extension:expense:2.0:User:approvalThreshold | Approval threshold. | Decimal |
urn:ietf:params:scim:schemas:extension:expense:2.0:User:ignoreManagerInRequests | Ignore manager in requests. | Boolean |
Expense schemaThe mapping of the Expense schema
extension:expenseis only useful for Spend accounts.
Custom fields
Custom fields are account-specific attributes defined in Settings > Cost management > Custom fields. Unlike the attributes in the Supported attributes table, the target attribute path is unique to your account and must be constructed before you can map them in Entra ID.
The target attribute for each custom field follows this pattern:
urn:ietf:params:scim:schemas:extension:perkcustomfields:2.0:User:cf_{slug}_{uuid}
Where {slug} is the field name lowercased with non-alphanumeric characters replaced by underscores, and {uuid} is the field's UUID in Perk. To find the UUID, open the field in Perk (Settings > Cost management > Custom fields) — it appears in the URL:
https://app.perk.com/account/custom-fields/{uuid}
Because Microsoft Entra ID doesn't discover account-specific custom fields automatically, you need to register each one manually before mapping it. Follow the steps in Add target attributes manually below, using:
- Name: the full target attribute path (e.g.
urn:ietf:params:scim:schemas:extension:perkcustomfields:2.0:User:cf_brand_138bcf1e-ce81-4eb6-b5f2-d62f8c817ac7) - Type: String
Once registered, map it using the standard steps in Customize attribute mappings.
Custom field attribute errorsUnknown attribute keys are silently ignored. If the target attribute doesn't match a known custom field, the user is still created or updated, but the custom field value is not written. Double-check the UUID against your field definitions if values are not appearing.
For a full walkthrough including payload examples, see Provision custom fields via SCIM.
Customize attribute mappings
To map a Perk attribute to a Microsoft Entra ID source attribute, follow these steps:
- Go to your Perk app in Microsoft Entra ID.
- Go to Provisioning > Settings > Mapping and select Provision Microsoft Entra ID Users.
- Review the list of attribute mappings that appears.
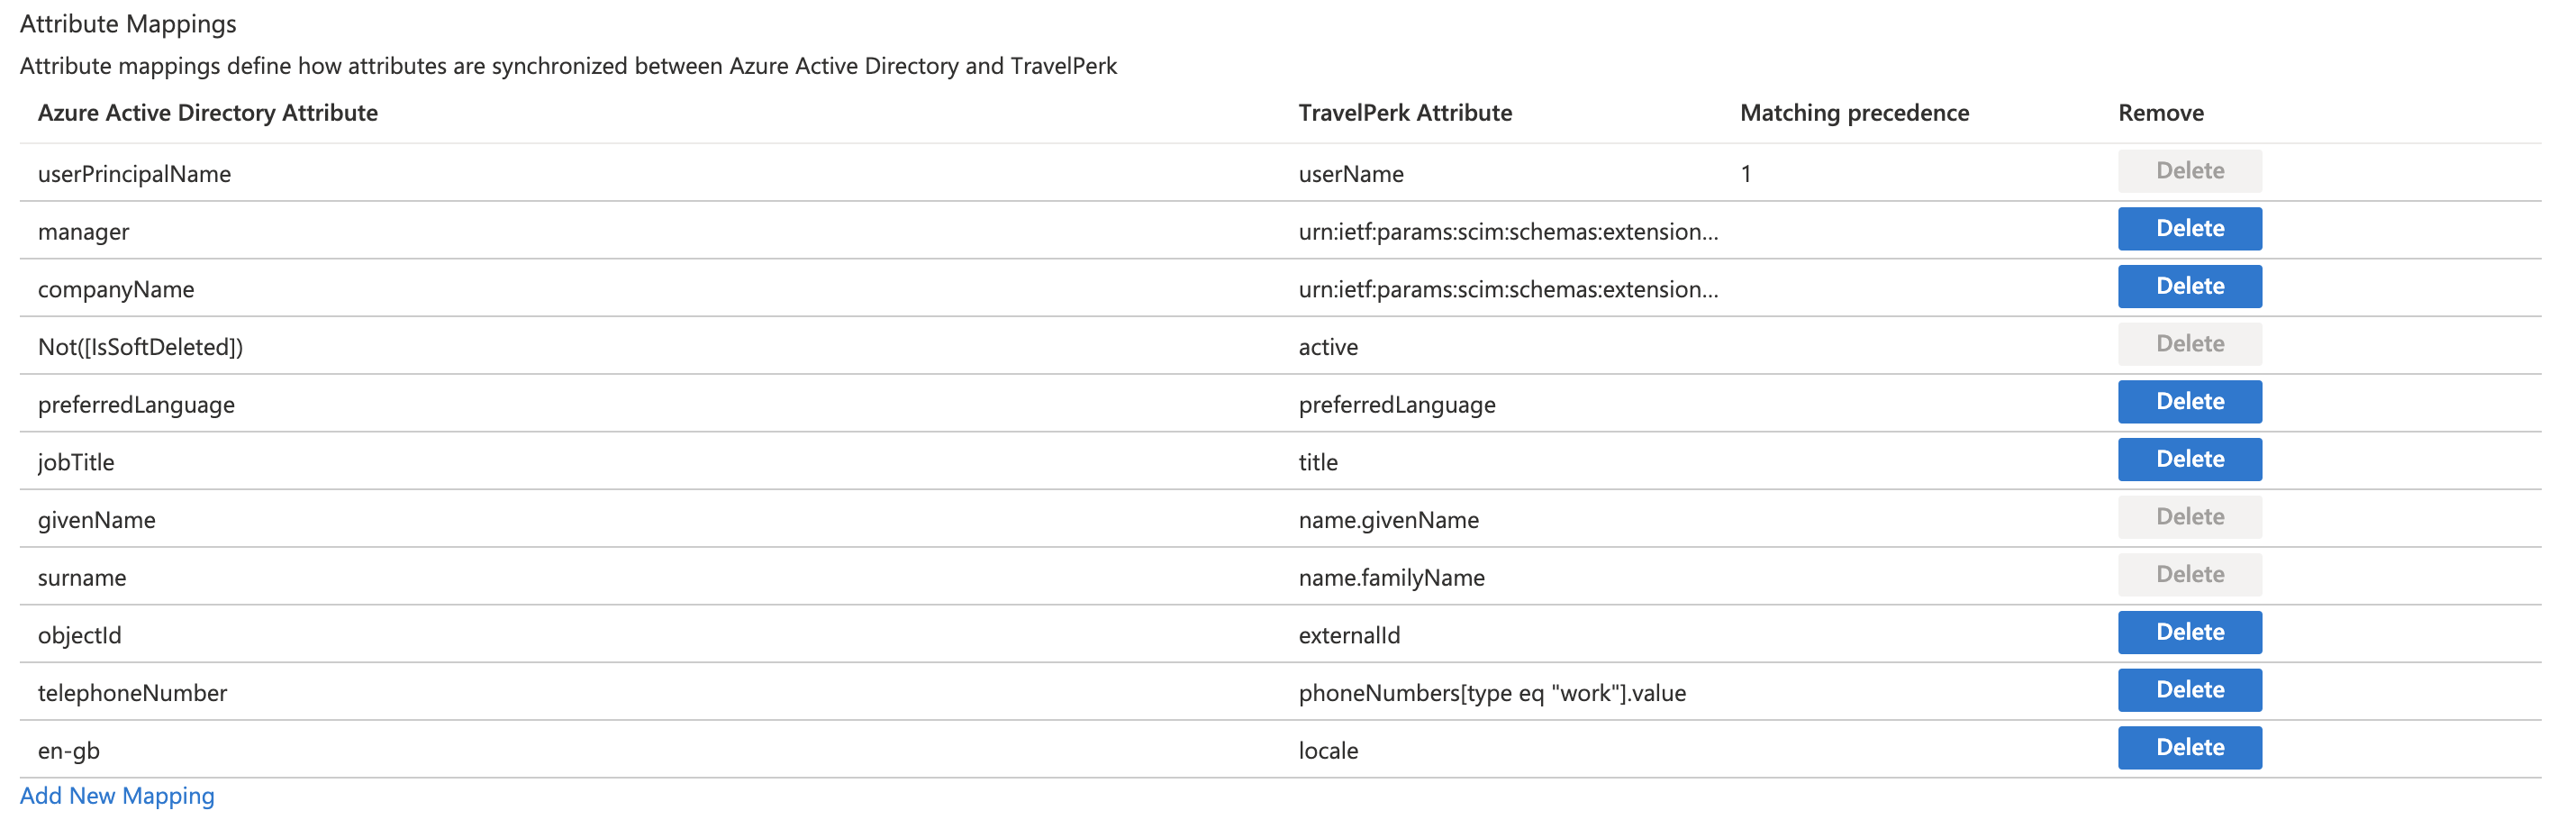
To add a new mapping:
- Select Add new mapping at the bottom-left of the screen.
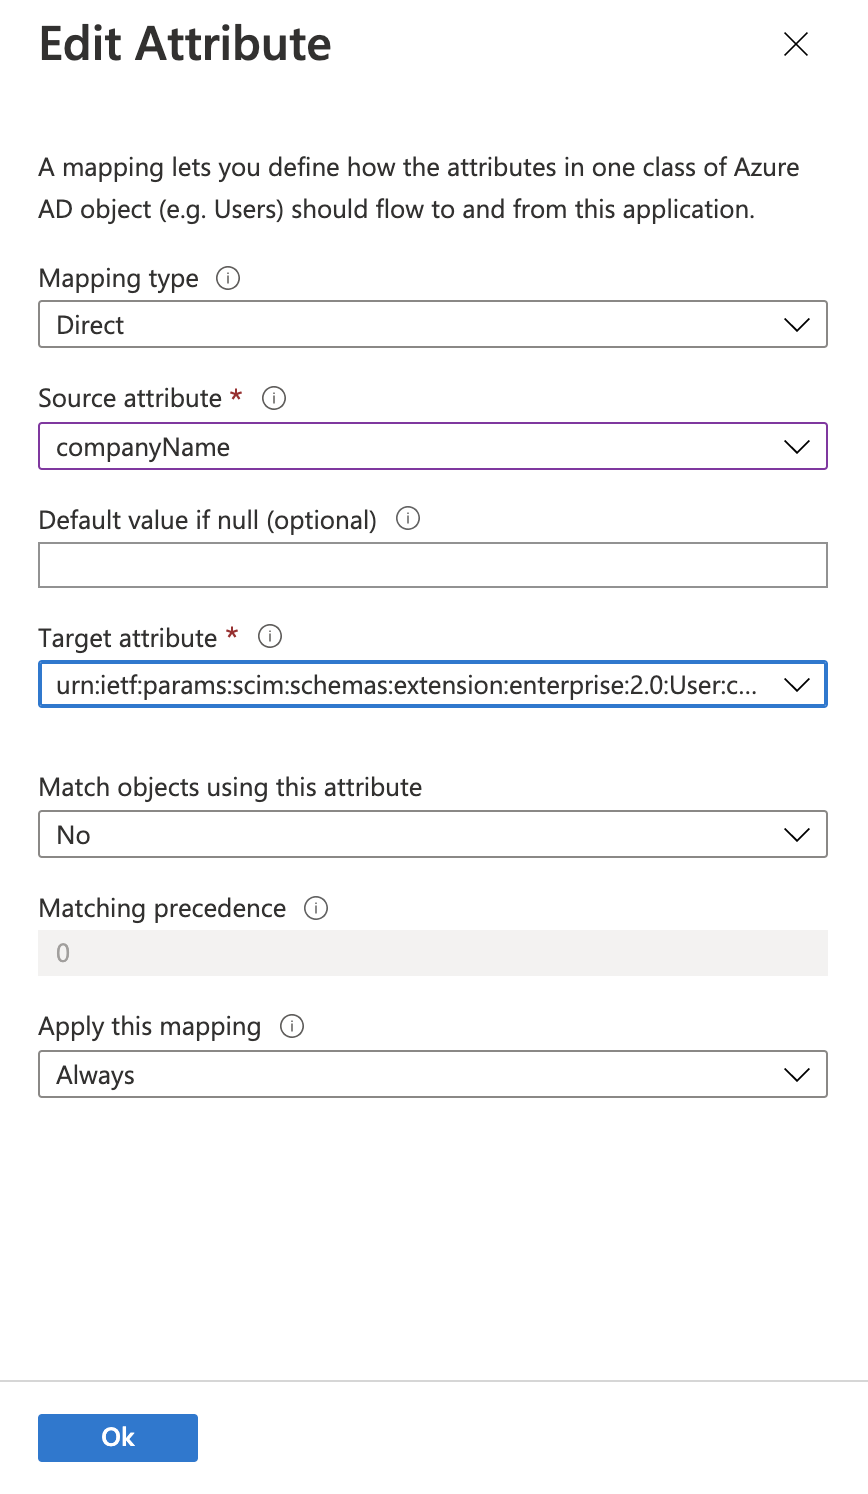
- Select the Source attribute from Microsoft Entra ID.
- Select the Target attribute from Perk. For the full list, see the Attribute mapping directory above.
For example, the screenshot below maps Microsoft Entra ID's companyName source attribute to the target attribute urn:ietf:params:scim:schemas:extension:enterprise:2.0:User:costCenter, which is the cost object in Perk.
To update an existing mapping:
- Select Delete to remove the existing mapping.
- Add the new mapping using the steps above.
- Select Save to apply your changes.
WarningMicrosoft Entra ID doesn't create travel policies or payment profiles for you. Create them in Perk before you run a sync, or the attribute values won't map correctly.
Troubleshooting: add target attributes by hand
Sometimes the app instance in Microsoft Entra ID falls out of sync with the latest SCIM schema from Perk. When this happens, some target attributes are missing from the mapping list. You can register the missing attributes by hand:
- Go to Microsoft Azure. The URL must end with
forceSchemaEditorEnabled=trueto allow these changes. - Open Enterprise Applications and select the existing TravelPerk app.
- Go to Provisioning > Edit Provisioning > Mappings > Provision Microsoft Entra ID Users.
- Scroll to the bottom and select Show advanced options > Edit attribute list for Perk.
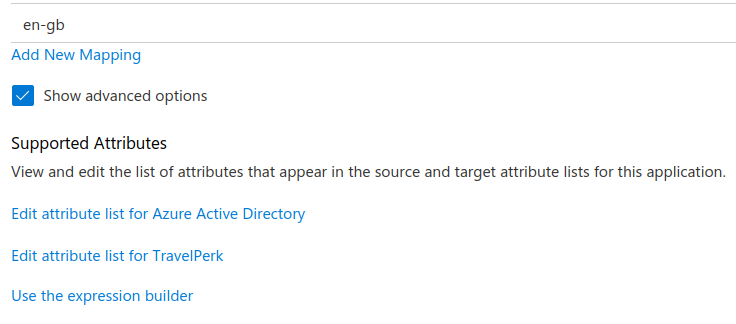
- Add a new attribute at the bottom of the list, using the name and type from the Attribute mapping directory above. Leave all other fields empty.
- Select Save.
- Map the new attribute using the Customize attribute mappings steps above.
Next steps
Updated 12 days ago