

Set up company syncing in Microsoft Entra ID
Sync company data from Microsoft Entra ID to Perk over SCIM, including a PowerShell script to force full syncs and fix the default-company issue.
This guide explains how to sync company data between Microsoft Entra ID (previously named Azure Active Directory or Azure AD) and Perk using automated user provisioning.
Prerequisites
- Microsoft Entra ID SCIM provisioning configured. For more information, see Get started with Microsoft Entra ID SCIM provisioning.
- Microsoft Entra ID administrator access.
NoteMicrosoft Entra ID doesn't support company syncing as a built-in feature yet. Follow the steps below to configure it manually.
Setting up company syncing
- Open Azure at this link: https://portal.azure.com/?Microsoft_AAD_Connect_Provisioning_forceSchemaEditorEnabled=true—
forceSchemaEditorEnabled=trueis required at the end of the URL. - Open Enterprise Applications > Locate the existing TravelPerk app, open it.
- Under Provisioning > Open Edit Provisioning > Mappings > Provision Microsoft Entra ID Users
- Scroll down to the bottom of the page and click Show advanced options > Edit attribute list for Perk
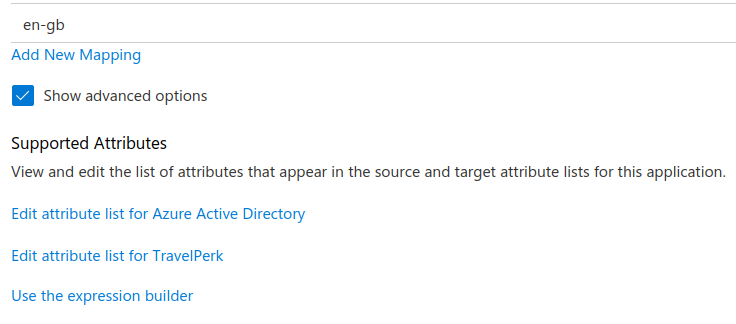
- Add a new attribute to the bottom of this list and eave all other fields empty:
-
Name: urn:ietf:params:scim:schemas:extension:travelperk:2.0:User:company
-
Type: String
-
- Click Save.
- Once the new field is added click Add new mapping.
- You can now use the Microsoft Entra ID attribute mapping guide to map the newly added company field to an existing Microsoft Entra ID attribute. The values to set are shown below:
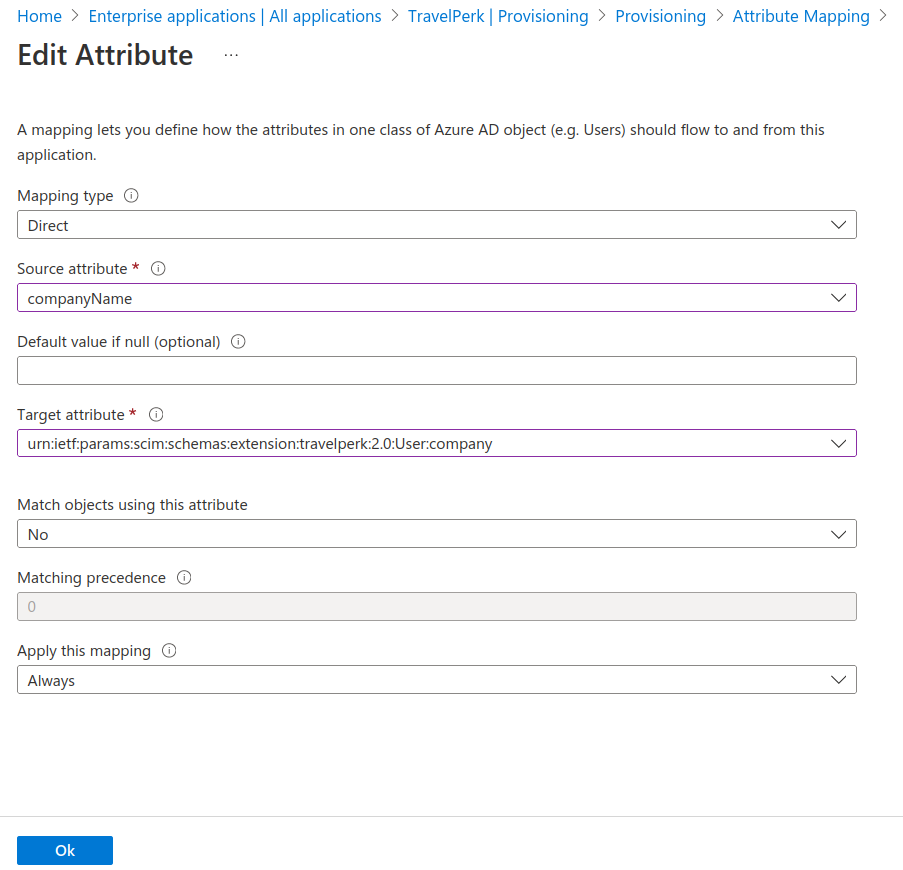
NoteCompany values must match the name of an existing company in Perk exactly. If the value doesn't match, the sync fails silently for that user.
Troubleshooting new users being assigned to the default company
There's a known issue with Microsoft Entra ID that means that company information is not sent automatically during the initial sync for any given user. When a user is created within Perk, Perk has no company information, so the new user is assigned to the default company within the account.
On subsequent data syncs for that user, Microsoft Entra ID only sends information that has changed, so it still won't send a company value for that user until it is changed or until a full sync is triggered manually from within Microsoft Entra ID.
The only way to automatically force Microsoft Entra ID to send company information for users is by running a full provisioning sync on a periodic basis, so that Microsoft Entra ID compares existing records and corrects them if the company is incorrect.
This can be automated on the Azure side by scheduling an Azure script to run every few days, similar to the sample below. It is written in PowerShell typically run as a Runbook in Azure Automation, possibly using a Managed Identity for authentication.
<#
Restart the SCIM provisioning process to get around a bug in the onboarding automation.
The "company" attribute isn't set on "create" cycle, only "update" cycle, so a force full sync is required via a job restart
Required Permissions for Managed Identity:
- Synchronization.ReadWrite.All
#>

Import-Module Microsoft.Graph.Authentication -ErrorAction Stop
$graphApiVersion = "beta"
$ClientId = "xxxx" # change to automation account managed identity ID
$SCIMObjID = "xxxx" # change to the object ID (not application ID) of the Perk SCIM Enterprise App
$jobID = "travelPerk.xxxx.xxxx" # change to jobID, jobID can be found via provisioning logs within the Enterprise app
Connect-MgGraph -Identity -ClientId $ClientId -ErrorAction Stop

# Make a REST API call to restart the SCIM provisioning cycle
$apiUrl = "https://graph.microsoft.com/$graphApiVersion/servicePrincipals/$SCIMObjID/synchronization/jobs/$jobID/restart"
$body = @{
"criteria" = @{
"resetScope" = "Watermark, Escrows, QuarantineState"
}
} | ConvertTo-Json
Invoke-MgRestMethod -Uri $apiUrl -Body $body -Method Post
Write-Output "Script Complete"
This needs configuring to the specifics of your account setup by replacing the following placeholder values:
| Variable | Description |
|---|---|
$ClientId | The Client ID of the managed identity used by the Automation Account. |
$SCIMObjID | The Object ID (not Application ID) of the SCIM-based Enterprise App (Perk in this case). |
$jobID | The SCIM provisioning job ID, which can be found in the provisioning logs of the Enterprise App. |
The Managed Identity executing this script must have the following Microsoft Graph API permission:
Synchronization.ReadWrite.All
This permission should be granted through Microsoft Entra ID app roles or via appropriate role assignment if using a system-assigned managed identity.
Next steps
This page will explain how to enable syncing your account's companies using automated User Provisioning and Microsoft Azure.
A prerequisite for this is a completed setup of User Provisioning in Azure, following this guide: https://developers.travelperk.com/docs/microsoft-azure-ad-scim-user-provisioning-getting-started
Due to a longer release process from Microsoft Azure's side, we are not able to provide this functionality out of the box yet, so we have prepared this handy article to help you set this sync up.
Steps:
- Access Microsoft Azure through this link: https://portal.azure.com/?Microsoft_AAD_Connect_Provisioning_forceSchemaEditorEnabled=true
theforceSchemaEditorEnabled=truepart is mandatory to allow these changes. - Open Enterprise Applications → Locate the existing TravelPerk app, open it.
- Under Provisioning → Open Edit Provisioning → Mappings → Provision Azure Active Directory Users
- Scroll down to the bottom of the page and click “Show advanced options” → Edit Attribute list for TravelPerk.
-
Add a new attribute to the bottom of this list, with the following values:
Name: urn:ietf:params:scim:schemas:extension:travelperk:2.0:User:company
Type: String
all other fields should remain empty
-
Save
-
Once the new field is added click “Add new mapping”
-
You can now use this guide to map the newly added company field to an existing Azure attribute. Basically these are the values to be set:
Remember!The values that are used for company must be identical to the name of an already existing Company in Perk.
Troubleshooting new users being assigned to the default company
There is a known limitation with Microsoft Azure which means that company information is not sent during the initial POST /Users sync for any given user. When that user is created within the Perk platform, no company information is received, so the new user will be assigned to the default company within the account.
Azure does not send a corrective update automatically afterwards, even when a full provisioning sync is triggered. The recommended workaround is to run a PowerShell script that directly patches TravelPerk's SCIM API using company data from the Microsoft Graph API, bypassing Azure's provisioning pipeline entirely.
Requirements:
- Microsoft.Graph.Users PowerShell module (Install-Module Microsoft.Graph.Users -Scope CurrentUser)
- Perk API key — generate one in TravelPerk: Settings → Developer tools → Travel tools → New API key
- Microsoft Graph permission: User.Read.All
  <#
  Correct company assignments for users provisioned via Azure AD SCIM.
  Azure does not send companyName on initial user creation, causing users to land
  in the default company. This script reads companyName from Entra ID and patches
  Perk's SCIM API directly to correct the assignment.

  Required permissions:
  - Microsoft Graph: User.Read.All
  - TravelPerk API key with SCIM access
  #>

  Connect-MgGraph -Scopes "User.Read.All"

  $scimToken = "xxxx"  # Perk API key (Settings → Developer tools → Travel tools → New API key)
  $scimBase  = "https://app.travelperk.com/api/v2/scim"
  $headers   = @{ Authorization = "ApiKey $scimToken" }

  $azureUsers = Get-MgUser -All -Property "id,companyName,userPrincipalName"

  foreach ($user in $azureUsers) {
      if (-not $user.CompanyName) { continue }

      $encoded    = [Uri]::EscapeDataString("externalId eq `"$($user.Id)`"")
      $tkResponse = Invoke-RestMethod -Uri "$scimBase/Users?filter=$encoded" -Headers $headers

      if ($tkResponse.totalResults -eq 0) { continue }

      $tkUser    = $tkResponse.Resources[0]
      $tkCompany = $tkUser.'urn:ietf:params:scim:schemas:extension:travelperk:2.0:User'.company

      if ($tkCompany -ne $user.CompanyName) {
          $patch = @{
              schemas    = @("urn:ietf:params:scim:api:messages:2.0:PatchOp")
              Operations = @(@{
                  op    = "replace"
                  path  = "urn:ietf:params:scim:schemas:extension:travelperk:2.0:User:company"
                  value = $user.CompanyName
              })
          } | ConvertTo-Json -Depth 5

          Invoke-RestMethod -Method Patch -Uri "$scimBase/Users/$($tkUser.id)" `
              -Headers ($headers + @{ "Content-Type" = "application/scim+json" }) `
              -Body $patch

          Write-Output "Updated $($user.UserPrincipalName): $tkCompany → $($user.CompanyName)"
      } else {
          Write-Output "Already correct: $($user.UserPrincipalName) ($tkCompany)"
      }
  }
This will need configuring to the specifics of your account setup, by replacing the following placeholder values:
| Variable | Description |
|---|---|
$scimToken | Perk API key. Generate one in Settings → Developer tools → Travel tools → New API key. |
Updated 15 days ago