When to use OAuth
Use OAuth if you're a Perk partner and you need to access other people's Perk accounts and data.
Perk's implementation of OAuth
For a complete overview of OAuth, see oauth.com or oauth.net.
To access other users' data, Perk uses the Authorization Code grant type. Perk doesn't currently support PKCE, so clients must have a server-side component to hold client secrets. (Perk doesn't currently support mobile applications authenticating directly with the API.)
Getting your OAuth application
To get started, create a new OAuth integration in the Perk sandbox. The sandbox lets you develop your integration against a development environment.
To create an application, share the following:
- the name of your tool, website, or project
- a redirect URL
- a logo image
- the API endpoints you'll be using
To publish your OAuth application to production and make it available to Perk customers, contact your Perk partner manager to discuss your use case.
Storing client IDs and client secretsStore this client secret securely. Don't commit it to version control or include it in frontend code.
How the OAuth flow works
Authorization
When you have your client ID and secret, you can begin the flow. The first step is to obtain an authorization code. Redirect the user's browser to begin the OAuth flow:
https://app.travelperk.com/oauth2/authorize?client_id=<client_id>&redirect_uri=<redirect_uri>&scope=<scopes>&response_type=code&state=<state><client_id>: provided to you during app creation<redirect_uri>: must match the value you provided during app creation<scope>: the list of scopes you have access to will be determined during the app creation process. Perk will provide a list of scopes — your request should only ask for the scopes you need from this user at this time. Each scope consists of an API name and a permission, separated by:. Pass multiple scopes separated by a space, for example:scope=bookings:read trips:read expenses:read. The scope string can be URL-encoded or plain.<response_type>: alwayscode<state>: a string value. Should be request-specific. Perk returns it on future requests.
When the user completes the flow on Perk's authorization page, their browser is redirected to the redirect_uri you provided. This redirect contains query params:
Either:
error: something has gone wrong (for example, the user declined the request). This is a string describing the problem.
Or:
code: the authorization code used in the next step.state: the state passed in the originalauthorizerequest. Verify that these values match.
Obtaining tokens
The authorization code received in this callback is a temporary token you must exchange for an access token. This is done through a server-to-server exchange:
curl --request POST \
  --url "https://app.travelperk.com/accounts/oauth2/token/" \
  --header "Content-Type: application/x-www-form-urlencoded" \
  --data-urlencode "grant_type=authorization_code" \
  --data-urlencode "code=<authorization_code>" \
  --data-urlencode "redirect_uri=<redirect_uri>" \
  --data-urlencode "client_id=<client_id>" \
--data-urlencode "client_secret=<client_secret>"<authorization_code>: the code from the previous step<redirect_uri>: the redirect URI used at the start of the flow. Must match exactly.<client_id>: provided during app creation<client_secret>: provided during app creation
Passing /token endpoint parametersParameters passed to the
/accounts/oauth2/tokenendpoint must be passed in the request body, not in query parameters. Requests with query parameters are rejected.
If this request is successful, the response contains the user's access token and a refresh token.
- Access tokens expire after 1 hour (3600 seconds).
- Refresh tokens expire after 30 days.
Refresh tokens
Refresh tokens let you obtain a new access token so the user doesn't have to reauthorize your application every hour. Use a refresh token the same way you used the authorization code:
curl --request POST \
  --url "https://app.travelperk.com/accounts/oauth2/token/" \
  --header "Content-Type: application/x-www-form-urlencoded" \
  --data-urlencode "grant_type=refresh_token" \
  --data-urlencode "refresh_token=<refresh_token>" \
  --data-urlencode "client_id=<client_id>" \
  --data-urlencode "client_secret=<client_secret>"
These parameters must be passed in the request body.
This successful request returns the same payload as the first call: a new access token and a new refresh token. Each refresh token can only be used once.
Revoke tokens
You can disable an integration by revoking the refresh token:
curl --request POST \
  --url "https://app.travelperk.com/accounts/oauth2/revoke_token/" \
  --header "Content-Type: application/x-www-form-urlencoded" \
  --data-urlencode "token_type_hint=refresh_token" \
  --data-urlencode "token=<refresh_token>" \
  --data-urlencode "client_id=<client_id>" \
  --data-urlencode "client_secret=<client_secret>"
These parameters must be passed in the request body.
After calling this endpoint, the integration for that client is disabled. The client can re-enable it via the integrations marketplace.
Using your OAuth credentials
Included in an Authorization headerWhen using the API, include the OAuth credential in an
Authorizationheader:Authorization: Bearer <your_access_token>.
curl \
  --url "https://api.perk.com/invoices" \
  --header "Api-Version: 1" \
  --header "Authorization: Bearer <your_access_token>"
How integrations are enabled
There are two ways a user can enable an integration.
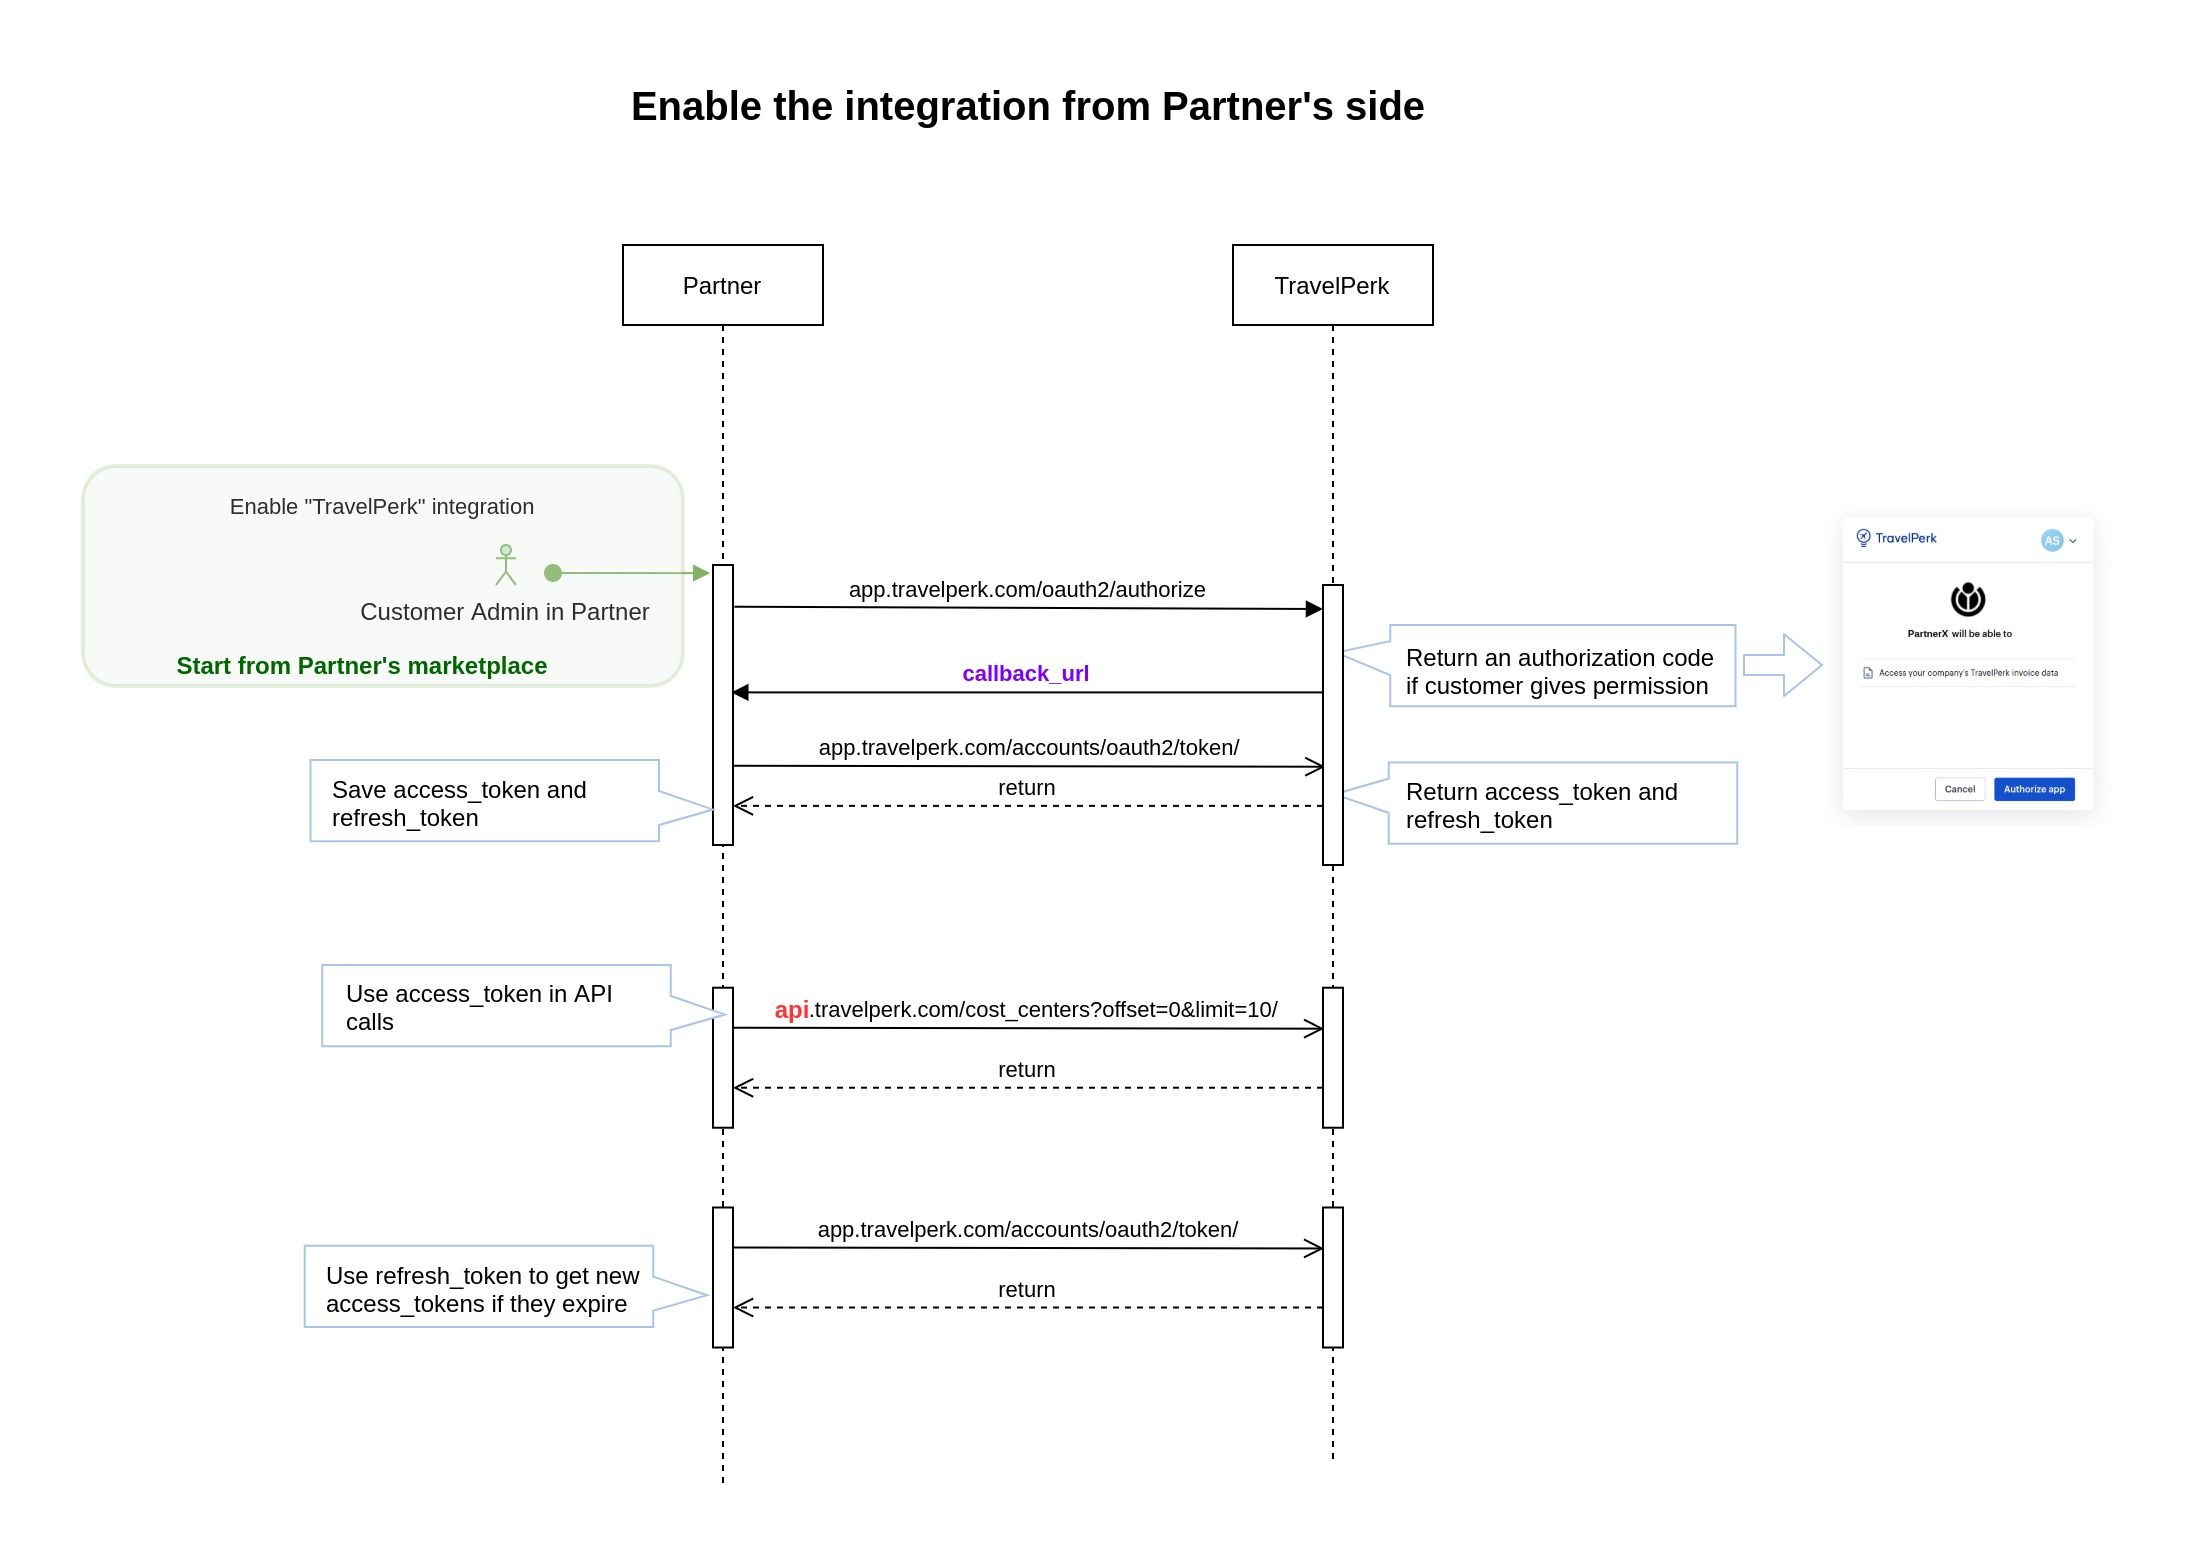
Integration enabled from the partner's side
Most integrations can be activated from the partner's integrations page. A customer who uses both the partner's product and Perk can find the Perk app on the partner's page and start the activation. These steps also describe the basic OAuth flow:
Integration enabled from Perk's integrations page
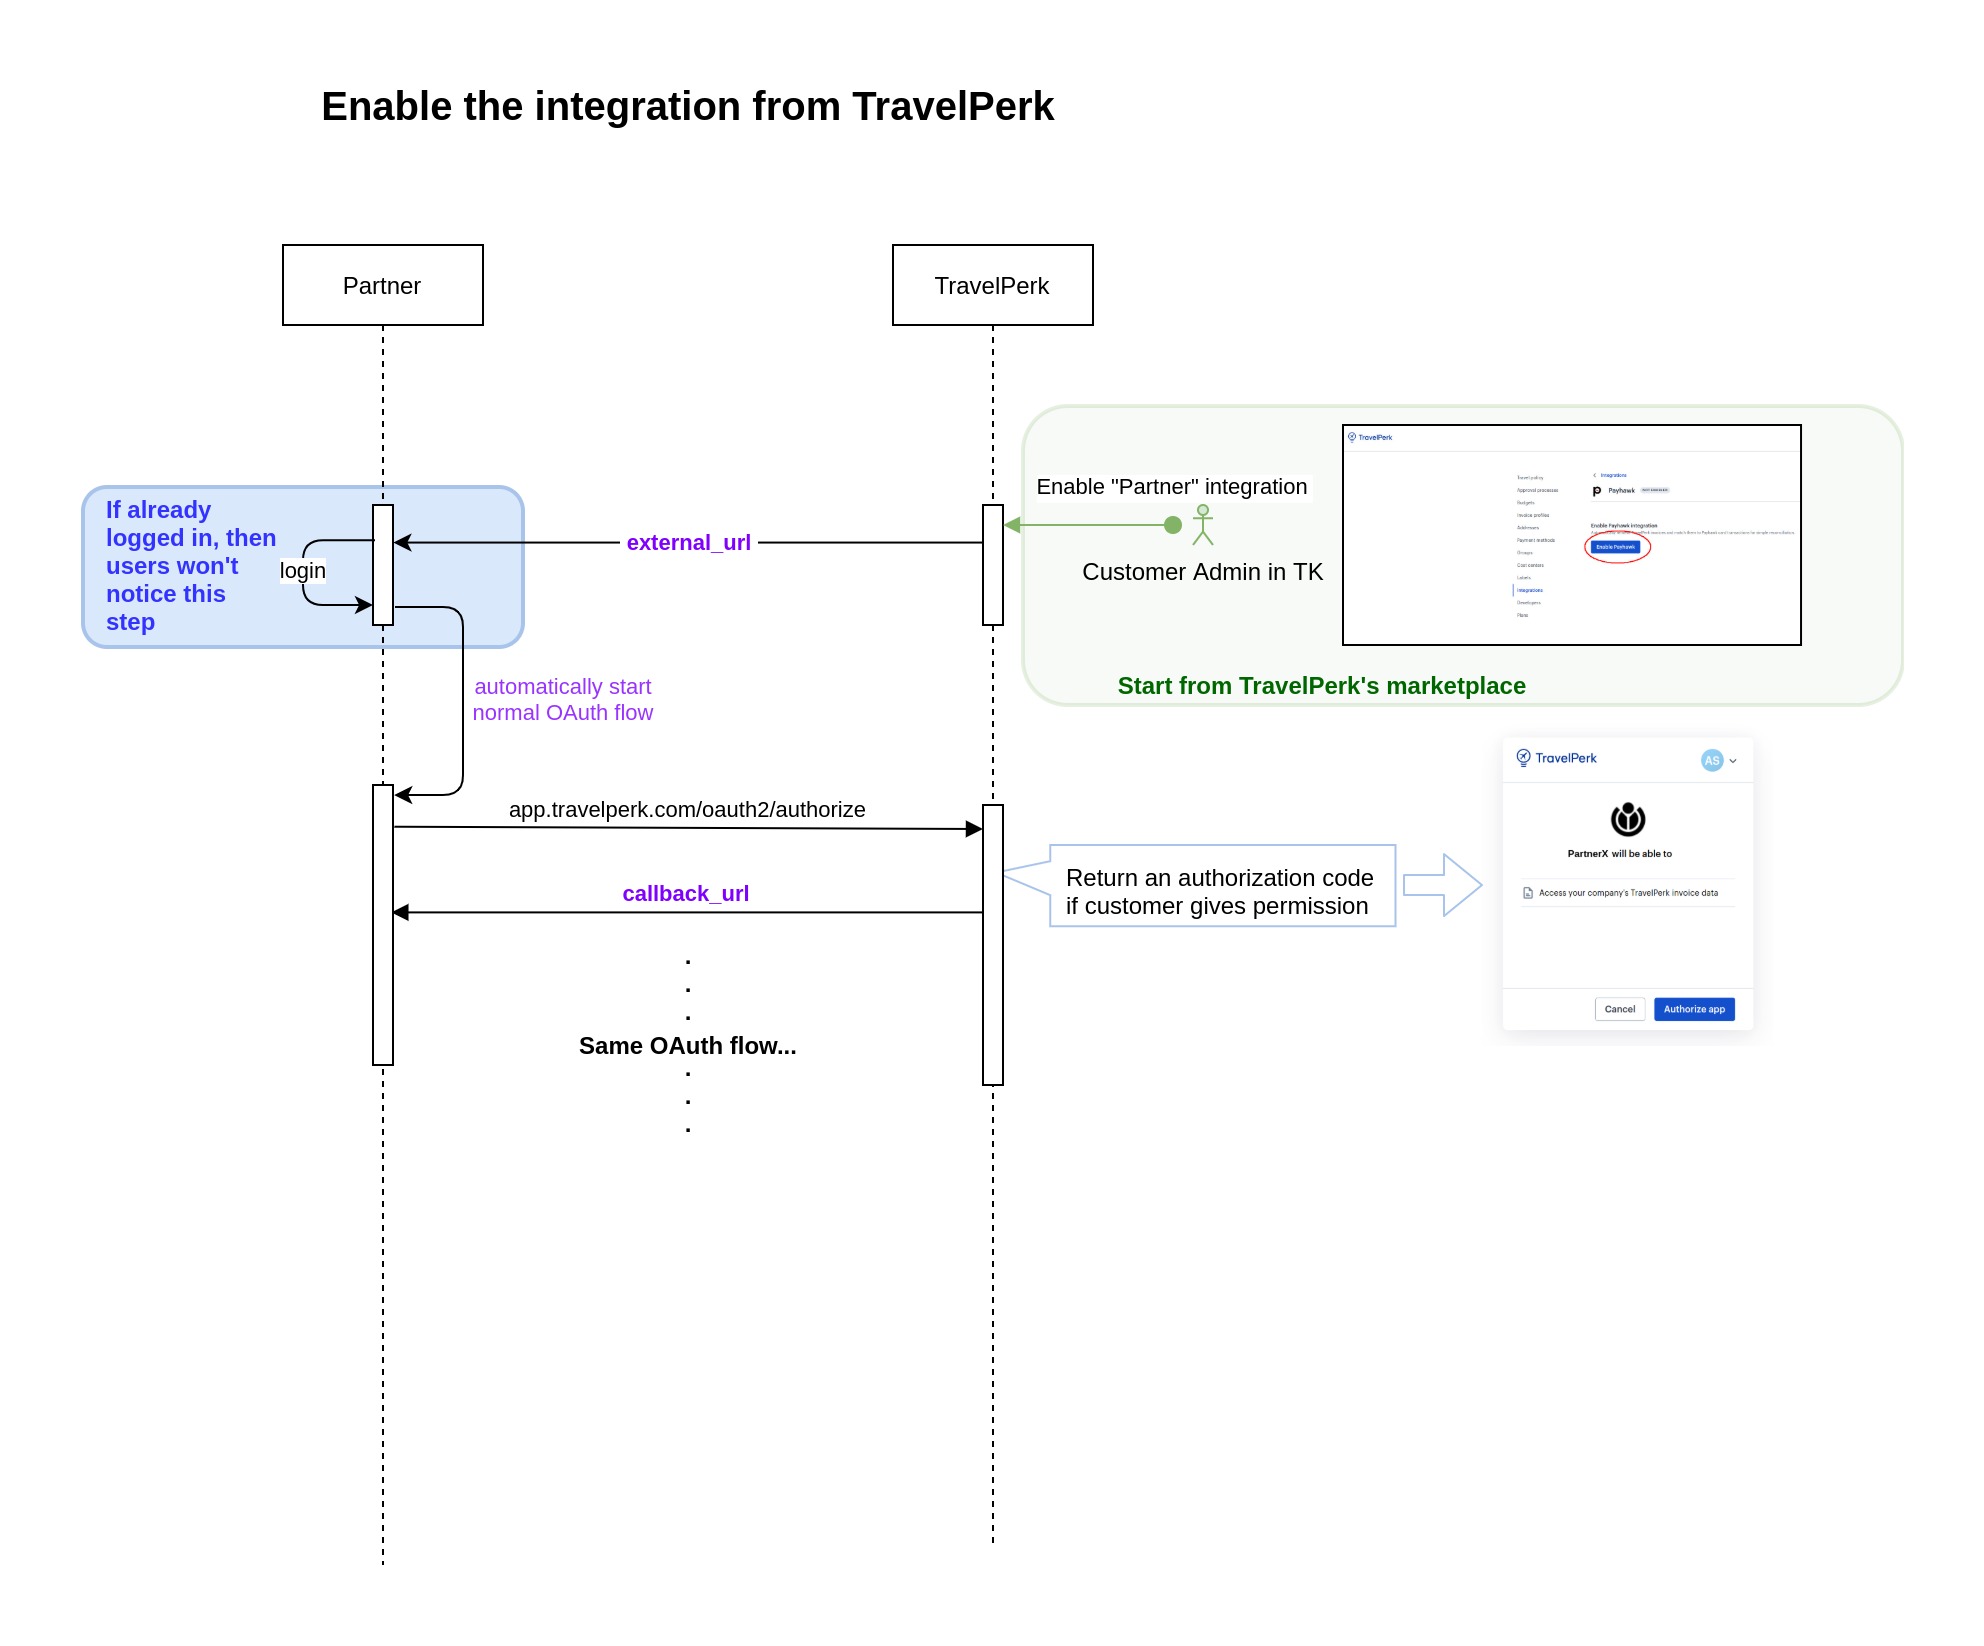
When a mutual customer is a Perk admin, they can activate the integration from Perk's integrations page. This requires an external_url to redirect the user to the partner's page to start the flow: